Interested in a pre-packaged Ubuntu OVA for Horizon 7? See my latest project here!
:: This post has been updated to included changes for Horizon 7.1 and Ubuntu 16.04. Any Horizon 7.1 specific callouts will be in GREEN ::
One of the more popular posts on That Virtual Boy has been Deploying Linux VDI Pools with Horizon 6. That post was written when Linux and VDI were just getting acquainted. Horizon has grown up a bit and we're now at Horizon version 7.0.2 which means we have plenty of new enhancements and capabilities to bring to the table. In this post, we're going to cover what has changed for Linux in Horizon since that last article, and then we'll dive right into the process of building out a Virtual Linux Desktop Infrastructure (VLDI? yeah.. I'm sticking with it!)
#VLDI
VMware docs tell us that changes have been made in Horizon 7 to how Linux desktops are managed - they're now vCenter managed instead of UNmanaged desktops (Horizon 6). This will require us to perform one of two actions to our existing Linux Desktops:
NOTE: Linux desktops still have to be deployed to a Manual Pool, similar to the process followed in my Horizon 6 post, unless creating an automated Full Clone pool which this article will cover.
Some call this the Golden Image, or the VDI Template.. I will refer to this as the Parent.
** Be sure to include the trailing / otherwise you'll be downloading everything from packages.vmware.com.
Ensure you see both keys listed in your directory, then import them.
Create the tools-install.list by first going to su, then entering the data below
Then run apt-get update and install the package
Then either log out and back in, or reboot
You can verify your tools version by running
NOTE: I will be installing and using Winbind. A good reference for doing this can be found here. For Ubuntu 16.04 on Horizon 7.1, you will also need to install
Enter the following at the shell to test kerberos authentication:
Use the command klist to verify you received a ticket.

3. Edit /etc/samba/smb.conf to look like below
[global]
workgroup = domainname
password server = hostname of domain controller
wins server = IP of wins server
realm = DOMAIN
security = ads
idmap uid = 16777216-33554431
idmap gid = 16777216-33554431
template shell = /bin/bash
winbind use default domain = false
winbind offline logon = false
winbind separator = +
allow trusted domains = Yes
4. Edit /etc/nsswitch.conf once again to include winbind
Restart Samba and Winbind.
Assuming those come up alright, let's join the domain:
Then test the join using:
Now let's test winbind:
Unfortunately SSO is not yet supported for Ubuntu Guests.It is currently supported with RHEL 6.6/6.7/6.8, CentOS 6.6, 6.7, 6.8, and SLED 11 SP3/SP4. As of Horizon 7.1, SSO is now supported with Ubuntu 14.04 and Ubuntu 16.06.
If you'd like to perform additional tweaks to the system like adjusting the launcher Icon sizes, Disable Shopping Suggestions, or customizing the theme, check out this post with lots of great tips and tricks. Note some items like default wallpaper will require additional default-user tweaking.
NOTE: The docs recommend using a gnome desktop session for increased performance.
Speaking of default user, we need to adjust the default login screen to allow domain users to enter their credentials, as well as ensure they get a profile upon logging in. I don't know why VMware docs fail to include any of this information. But if you don't follow these steps, your final desktop will have only two login options: the admin user you created, and Guest login. There won't be an option for domain users to login.
The Horizon Agent configuration file allows us to make certain tweaks such as Build to Lossless, support left-handed mouse devices, specify max Blast bandwidth, etc. The list is available here. For the purpose of this article, the only option we will modify is the RunOnceScript since we're using Winbind. We'll need each clone to run the Domain Join command after being created.
Horizon 7.0.2+ now supports two methods for managing Linux Desktop Pools
In this post, we'll use automated full-clone pools. Assuming you've been following along, our Parent image should be good to go with the necessary prerequisites. Now we need to create the customization spec in vCenter.
Now lets jump over to Horizon Administrator
Thanks for reading!
:: This post has been updated to included changes for Horizon 7.1 and Ubuntu 16.04. Any Horizon 7.1 specific callouts will be in GREEN ::
One of the more popular posts on That Virtual Boy has been Deploying Linux VDI Pools with Horizon 6. That post was written when Linux and VDI were just getting acquainted. Horizon has grown up a bit and we're now at Horizon version 7.0.2 which means we have plenty of new enhancements and capabilities to bring to the table. In this post, we're going to cover what has changed for Linux in Horizon since that last article, and then we'll dive right into the process of building out a Virtual Linux Desktop Infrastructure (VLDI? yeah.. I'm sticking with it!)
#VLDI
:: What's changed since the last article
- No more 32bit Linux desktops. x64 Architecture is required.
- Support for NVIDIA GRID vGPU, vSGA, RHEL 7.1 and Ubuntu 14.04
- View Agent installation of JRE 8 is now automated
- Blast Protocol changed from using port 5443 to 22443
- Support for Clipboard Redirection (clipboard memory size also configurable)
- Support for Single Sign On (SSO) >>
Only for SLED, RHEL, and CentOS - Support for Smart Card Redirection with SSO
- Support for SLED 11 SP3/SP4
- Support for HTML Access 4.0.0 on Chrome
- Support for CentOS 7.1
- Support for SLES 12 SP1
- Support to check dependency packages unique to your distro before installing the Horizon Agent
- Support to use the Subnet option of /etc/vmware/viewagent-custom.conf to specify the subnet used for Linux Desktop connection with multiple subnets connected
- Support for H.264 encoder software
- Support for managed virtual machines (woot!)
- Support for Horizon Client for iOS/Android (woot! woot!)
- Support for Automated full-clone desktop pools (<insert triple woot!>)
- RHEL 7.3, CentOS 7.3, SLED 12 SP2, and SLES 12 SP2 support
- Linux Agent Single Sign On (SSO) for Ubuntu 14/16
- Client Drive Redirection (CDR) available as tech preview
- USB Redirection available on Ubuntu 14/16 as tech preview
- Keyboard Layout/Locale Synchronization supported on Windows Client
VMware docs tell us that changes have been made in Horizon 7 to how Linux desktops are managed - they're now vCenter managed instead of UNmanaged desktops (Horizon 6). This will require us to perform one of two actions to our existing Linux Desktops:
- Upgrade to 7.0.2 and retain the unmanaged VM.
- Upgrade to 7.0.2 and convert the VM to a managed VM.
NOTE: Linux desktops still have to be deployed to a Manual Pool, similar to the process followed in my Horizon 6 post, unless creating an automated Full Clone pool which this article will cover.
:: Getting Started
Before jumping in, there are a few prerequisites that should be considered.- Will your Linux Desktops be using 2D graphics or 3D graphics? Currently only RHEL 6.6/6.7/6.8 and 7.2 can utilize 3D graphics. See VMware Pubs for more info.
- Confirm supportability for your desired guest distro.
- Ensure vSphere is version 5.5 u3 (for Horizon 7.0.x), or 6.0 u2 (for Horizon 7.1) or later
- Best stick with the latest Horizon Client available for the client machines. See what's new with Horizon Client 4.2 here. (Latest Client Downloads Here)
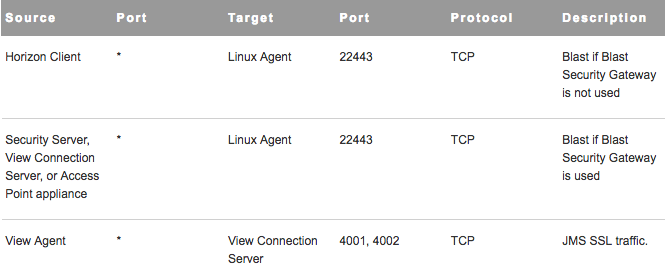
- Verify Ports
- Verify recommended vCPU and vRAM sizing based on your configuration needs.
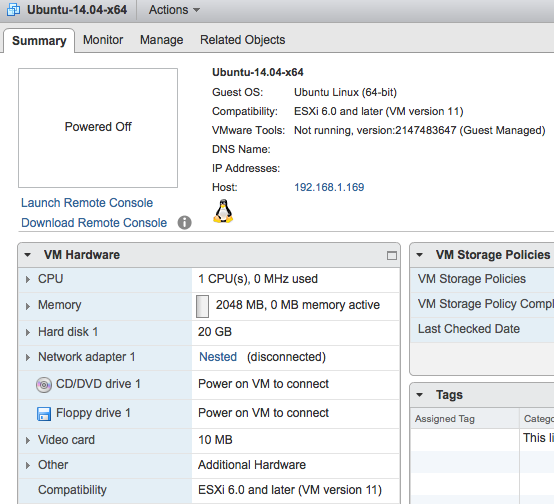
:: Preparing our Parent Image
Some call this the Golden Image, or the VDI Template.. I will refer to this as the Parent.
- First, create a new VM. We'll be using Ubuntu 14.04 x64. Notice my vRAM configuration. 10 MB is the minimum vRAM size recommendation for a machine that is configured with a single monitor at the lowest resolution.
- Make any necessary network configurations to gain network access, and ensure the VM is fully patched. You'll want to ensure you can ping your Connection Servers by FQDN.
[gallery ids="1714,1712,1711" type="rectangular"] - Now we'll install VMware Tools. Previously, we just mounted the ISO from ESXi and installed it. However, VMware now recommends installing Open VM Tools - a tools package managed through the OS's native packaging system. This is actually a much better way to manage Tools for Linux desktops. Follow along with the Ubuntu 14.04 Open VM Tools Guide Here. For Horizon 7.1 and Ubuntu 16.04, open-vm-tools-desktop is already in the Ubuntu repositories, so all you need to do is type 'apt-get install open-vm-tools-desktop' and skip the rest of this step.
- Starting at Step 2 from the guide, we download the VMware Package Keys in order to add the deployPkg Tools Plugin.
cd ~
mkdir vmw_pckg_keys
cd vmw_pckg_keys
wget -r --no-parent --reject "index.html*" http://packages.vmware.com/tools/keys/
** Be sure to include the trailing / otherwise you'll be downloading everything from packages.vmware.com.
Ensure you see both keys listed in your directory, then import them.
sudo apt-key add VMWARE-PACKAGING-GPG-DSA-KEY.pub
sudo apt-key add VMWARE-PACKAGING-GPG-RSA-KEY.pub
Create the tools-install.list by first going to su, then entering the data below
sudo su -
echo "deb http://packages.vmware.com/packages/ubuntu precise main" > /etc/apt/sources.list.d/vmware-tools/list

Then run apt-get update and install the package
# apt-get update && apt-get install open-vm-tools-dploypkg
Then either log out and back in, or reboot
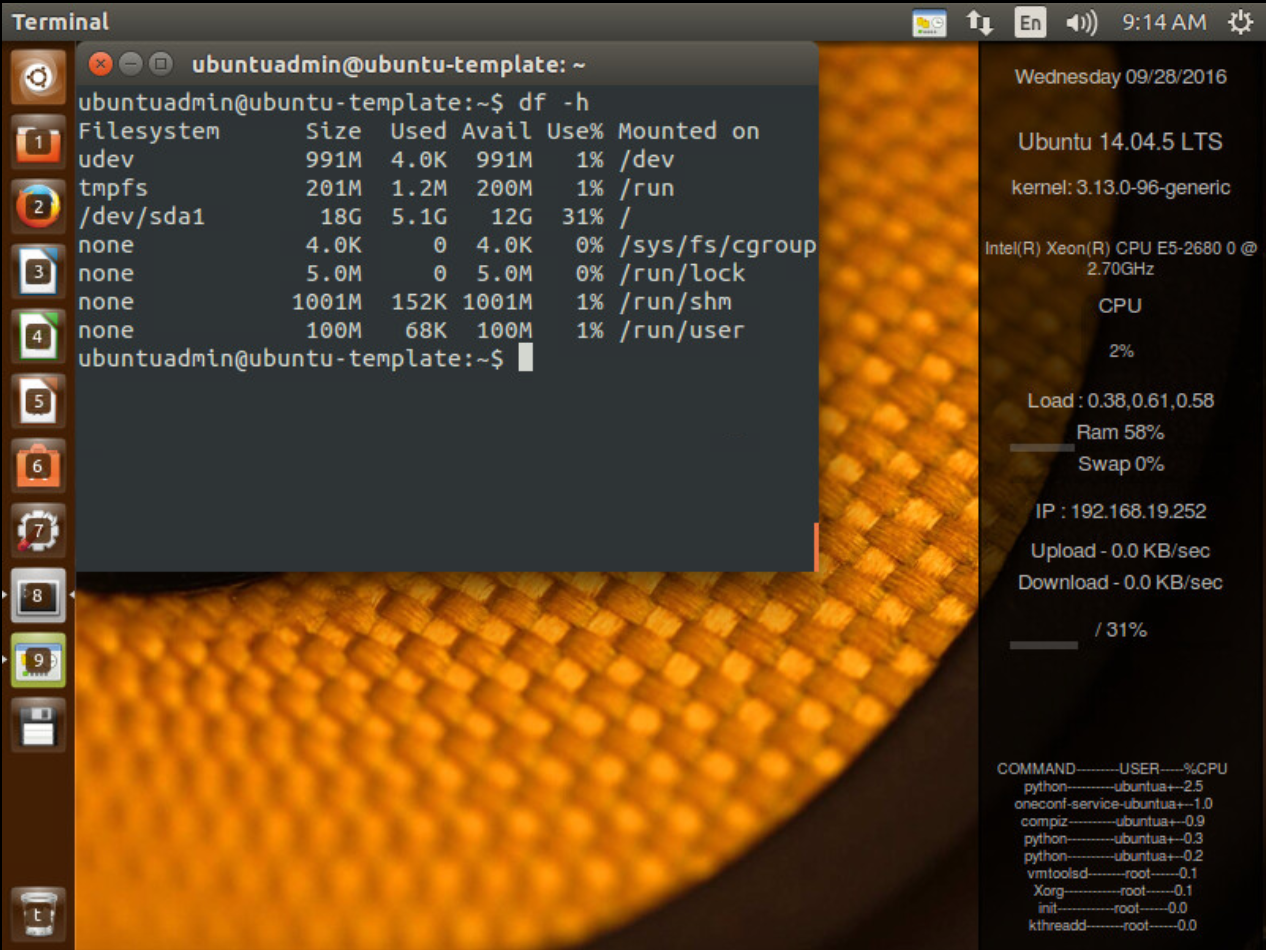
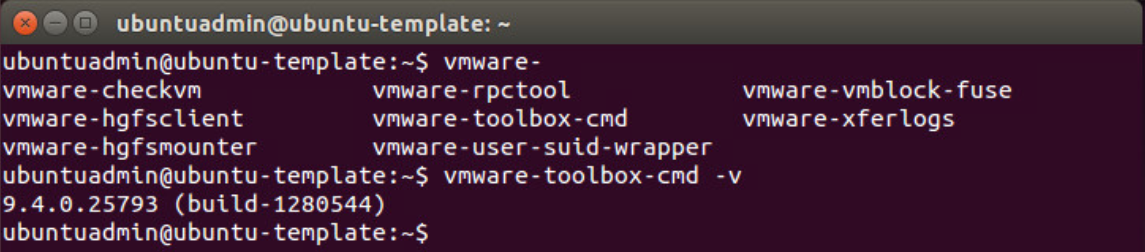
You can verify your tools version by running
vmware-toolbox-cmd -v
:: System OS Tweaks
- Set Default Run Level to 5
sudo vi /etc/init/rc-sysinit.conf
Change this line to runlevel 5env DEFAULT_RUNLEVEL=5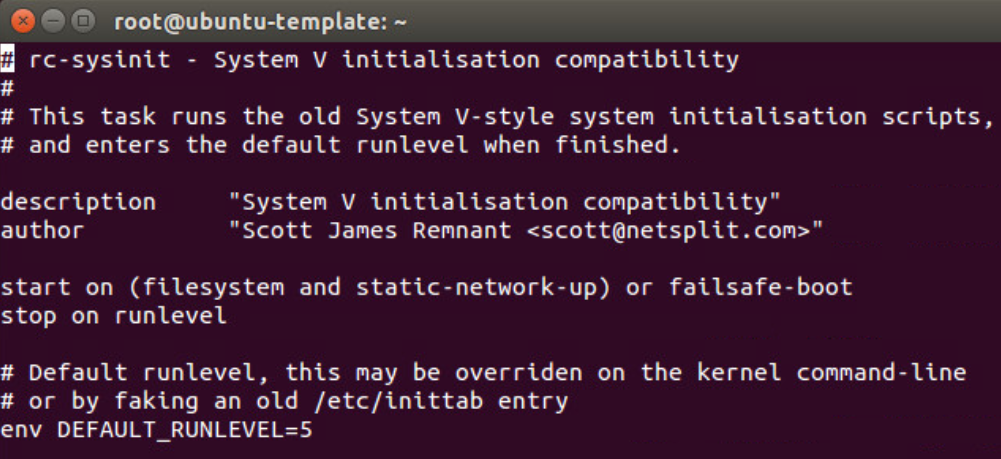
- On an Ubuntu machine that was configured to authenticate with an OpenLDAP server, set the fully qualified domain name on the machine.
- Edit the nsswitch.conf file to improve the VM's network outage recovery capability
vi /etc/nsswitch.conf
Change this line tohosts: cache db files dns
- Install Dependency Packages for Horizon Agent (Ubuntu 14.04)
wget http://launchpadlibrarian.net/201393830/indicator-session_12.10.5+15.04.20150327-0ubuntu1_amd64.deb
sudo dpkg -i ./indicator-session_12.10.5+15.04.20150327-0ubuntu1_amd64.deb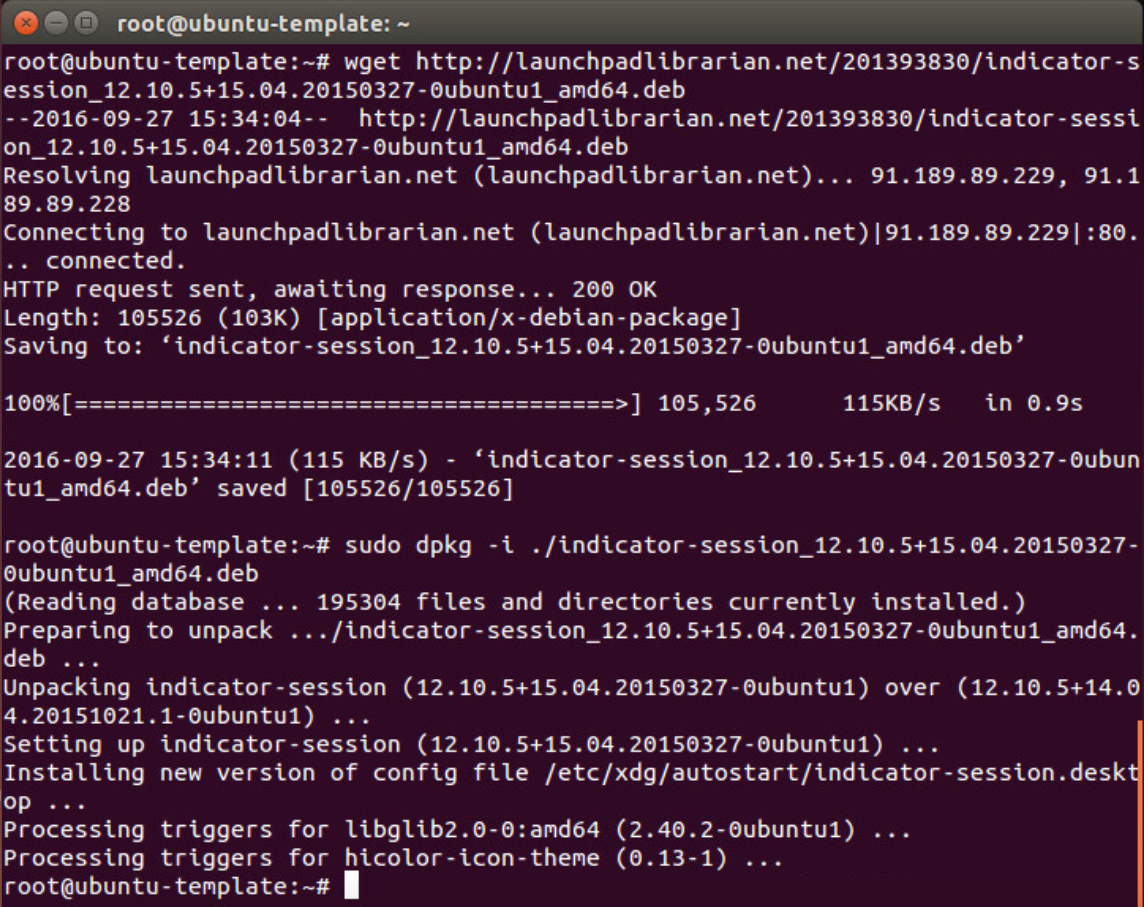
For Ubuntu 16.04
apt-get install python-dbus python-gobject:: Configure Ubuntu to Integrate with Active Directory
NOTE: I will be installing and using Winbind. A good reference for doing this can be found here. For Ubuntu 16.04 on Horizon 7.1, you will also need to install
libnss-winbind and libpam-winbind"With the Winbind solution, the step to join the domain will fail because each cloned VM has a different host name. Each cloned VM needs to run the following command to rejoin the domain" - so we will add this to our logon scripts. << Per Documentation
sudo /usr/bin/net ads join -U <domain user>%<domain password>
- Update /etc/hosts to include the Domain Server

- Edit /etc/krb5.conf to look like this
[libdefaults]
ticket_lifetime = 600
default_realm = YOURDOMAIN
default_tkt_enctypes = des3-hmac-sha1 des-cbc-crc
default_tgs_enctypes = des3-hmac-sha1 des-cbc-crc
[realms]
YOURDOMAIN = {
kdc = IP of your AD
default_domain = YOURDOMAIN
}
[domain_realm]
.yourdomain = YOURDOMAIN
yourdomain = YOURDOMAIN
[kdc]
profile = /etc/krb5kdc/kdc.conf
[logging]
kdc = FILE:/var/log/krb5kdc.log
admin_server = FILE:/var/log/kadmin.log
default = FILE:/var/log/krb5lib.log
Enter the following at the shell to test kerberos authentication:
kinit username@DOMAIN

Use the command klist to verify you received a ticket.
3. Edit /etc/samba/smb.conf to look like below
[global]
workgroup = domainname
password server = hostname of domain controller
wins server = IP of wins server
realm = DOMAIN
security = ads
idmap uid = 16777216-33554431
idmap gid = 16777216-33554431
template shell = /bin/bash
winbind use default domain = false
winbind offline logon = false
winbind separator = +
allow trusted domains = Yes
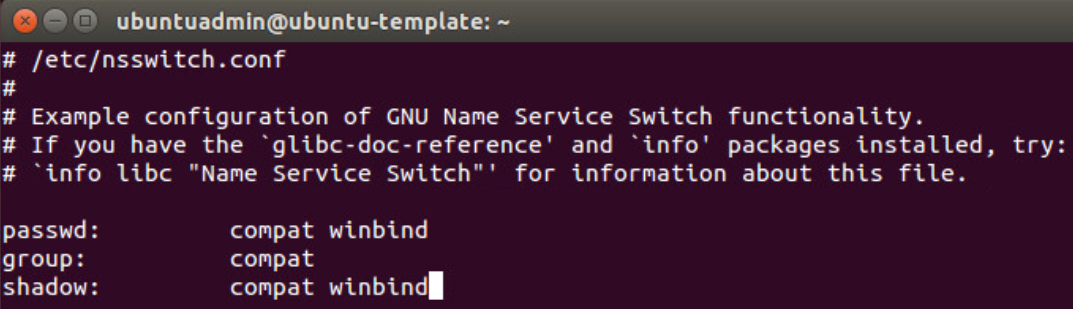
4. Edit /etc/nsswitch.conf once again to include winbind
passwd: compat winbind
shadow: compat
group: compat winbind
Restart Samba and Winbind.
sudo service smbd restart && sudo service winbind restart
Assuming those come up alright, let's join the domain:
net ads join -U username%password

Then test the join using:
net ads testjoin

Now let's test winbind:
wbinfo -u (This will list your AD users)
wbinfo -g (This will list your AD Groups)

:: Configure Single Sign-on (SSO)
- Be sure you set winbind use default domain in your smb.conf to be true
- Follow the steps here to set this up for your supported distro.
:: Additional User Experience Tweaks
If you'd like to perform additional tweaks to the system like adjusting the launcher Icon sizes, Disable Shopping Suggestions, or customizing the theme, check out this post with lots of great tips and tricks. Note some items like default wallpaper will require additional default-user tweaking.
NOTE: The docs recommend using a gnome desktop session for increased performance.
Speaking of default user, we need to adjust the default login screen to allow domain users to enter their credentials, as well as ensure they get a profile upon logging in. I don't know why VMware docs fail to include any of this information. But if you don't follow these steps, your final desktop will have only two login options: the admin user you created, and Guest login. There won't be an option for domain users to login.
- To have every new user get a home directory upon logging in, have sudoer type:
echo 'session required pam_mkhomedir.so skel=/etc/skel/ umask=0022' >> /etc/pam.d/common-session

- To adjust the login screen to allow domain users, remove Guest login, and hide previously logged in accounts, have sudoer type:
echo 'greeter-show-manual-login=true' >> /usr/share/lightdm/lightdm.conf.d/50-ubuntu.conf

echo 'greeter-hide-users=true' >> /usr/share/lightdm/lightdm.conf.d/50-ubuntu.conf

echo 'allow-guest=false' >> /usr/share/lightdm/lightdm.conf.d/50-ubuntu.conf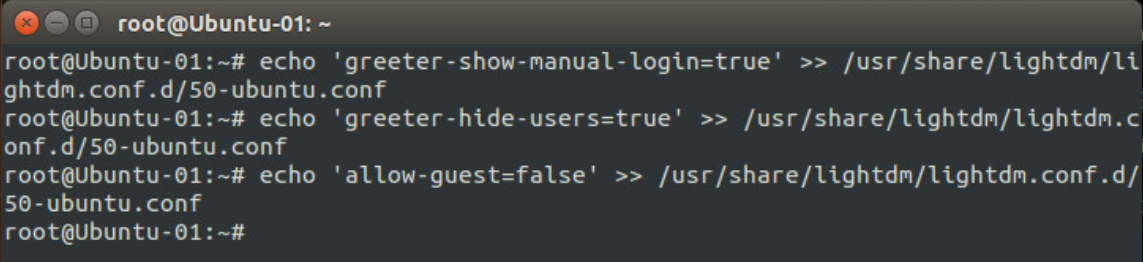
:: Install the Horizon Agent
- Download the appropriate Horizon Agent for Linux Installer
- Unpack the tarball
tar -xzvf <horizon_agent_filename>
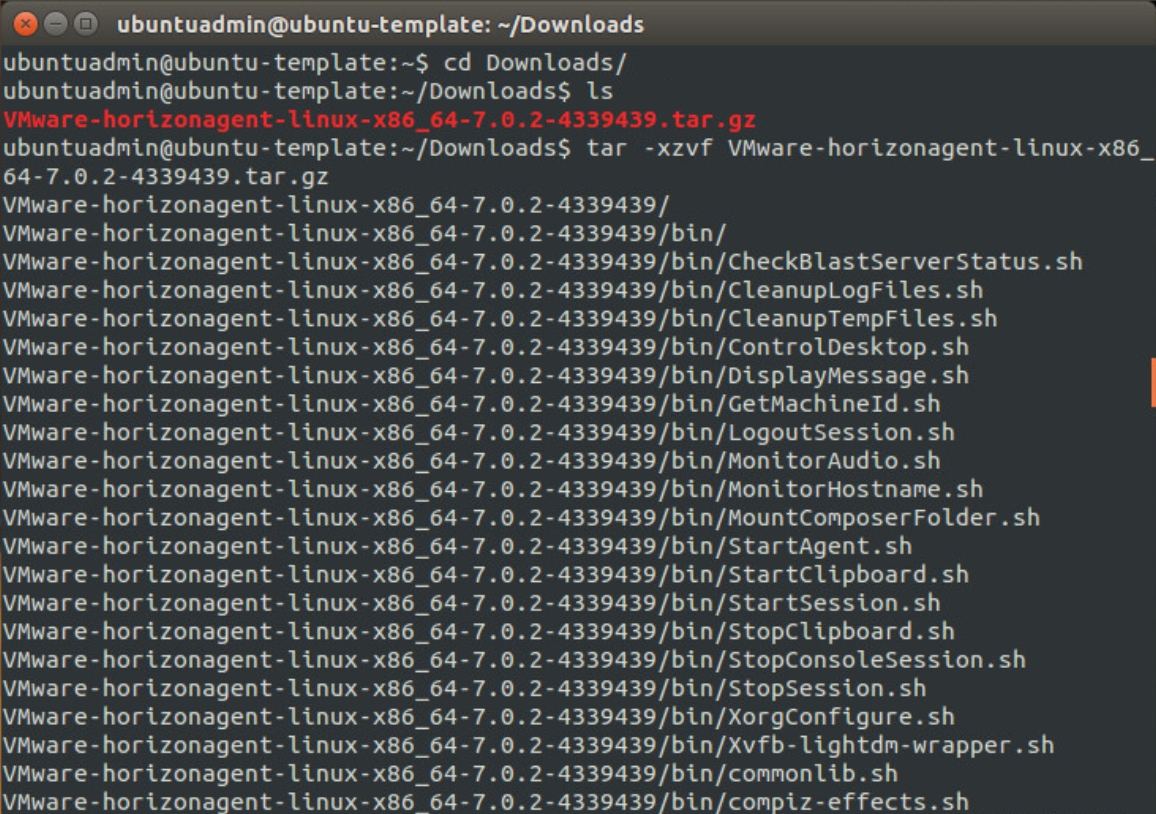
- Navigate to the extracted folder and run the shell script as super user
sudo ./install_viewagent.sh -A yes
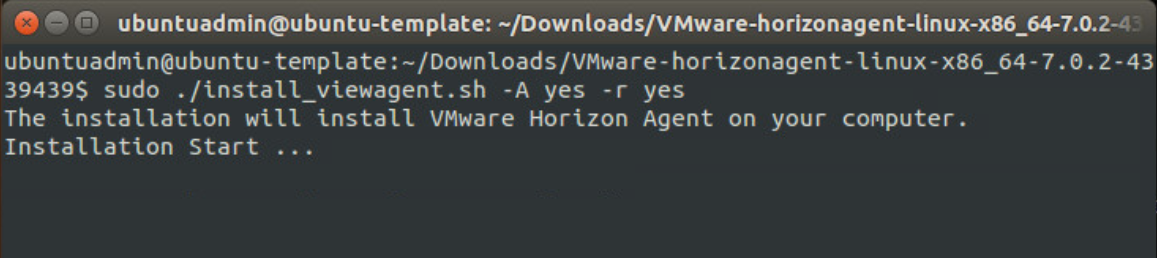
- NOTE: if you're upgrading the agent on an existing Horizon Linux VM, you don't have to uninstall the agent first. The installer will handle that for you.
- There are special parameters you can use on the install command. For example, if you are upgrading the agent on an existing Horizon Linux Desktop, etc. See the doc here for available commands.
:: Configure Options for Horizon Agent
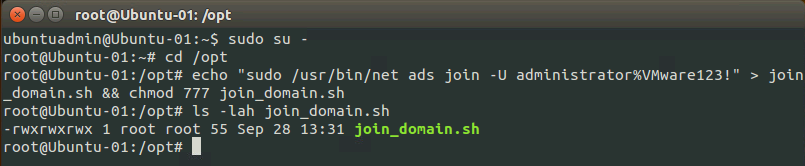
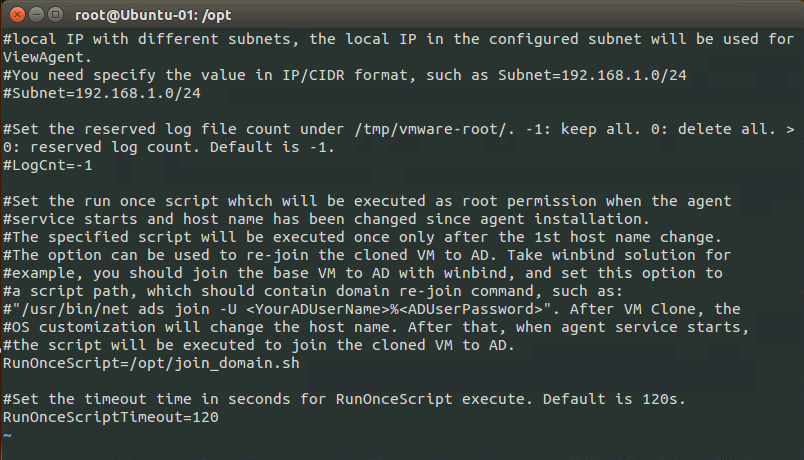
The Horizon Agent configuration file allows us to make certain tweaks such as Build to Lossless, support left-handed mouse devices, specify max Blast bandwidth, etc. The list is available here. For the purpose of this article, the only option we will modify is the RunOnceScript since we're using Winbind. We'll need each clone to run the Domain Join command after being created.
- Create the script and place it /opt. I'm calling mine join_domain.sh. You'll also want to chmod 777 the file so there aren't any issues running the script later.
- Now modify /etc/vmware/viewagent-custom.conf to look like below. Be sure to uncomment the line, as well as the RunOnce Timeout if desired.
- For example Blast Settings, see the configurations here
- Unlike traditional Windows VDI desktops, the Linux Console is viewable from the vSphere Console, even when a user is logged in. To make the console blank when a user is logged in, you need to modify the Linux VM's VMX file by adding the line
RemoteDisplay.maxConnections = "0"
- At this point, our Parent VM should be complete. You can shut it down and convert it to a Template, or clone it to a Template to be used in the section below.
:: Creating the Desktop Pool
Horizon 7.0.2+ now supports two methods for managing Linux Desktop Pools
- Manual Desktop Pool with vCenter VMs (similar to how we did in Horizon 6)
- Automated full-clone desktop pool
In this post, we'll use automated full-clone pools. Assuming you've been following along, our Parent image should be good to go with the necessary prerequisites. Now we need to create the customization spec in vCenter.
- In the vSphere Web Client, go to Policies and Profiles > Customization Specification Manager
- Click Create a New Specification
- Select Linux as the Target OS
- Let's name this Linux_VDI_Custom_Spec
- Complete the form as follows
SettingValueTarget Virtual Machine OSLinuxComputer NameUse the Virtual Machine NameDomainSpecify the domain of the View environmentNetwork SettingsUse Standard Network SettingsSpecify DNSEnter a valid address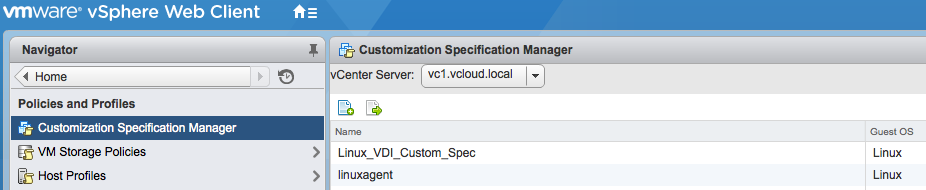
Now lets jump over to Horizon Administrator
- Catalog > Desktop Pools > Add
- Choose Automated Desktop Pool
- Pick your assignment preference. I'll use Floating.
- Choose Full virtual machines
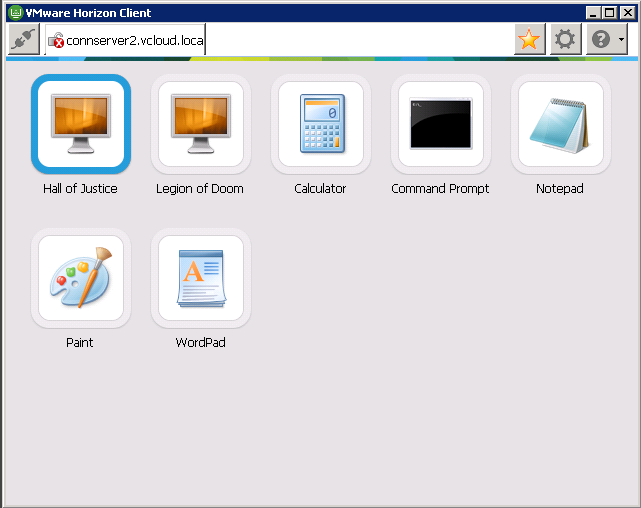
- Enter your Pool ID and Display Name. Mine will be Legion of Doom (to pair nicely with my Hall of Justice Instant Clone pool!)
- For Desktop Pool Settings, choose
Default display protocol: VMware Blast
Allow users to chose protocol: No
3D Renderer: Manage using vSphere Client for 2D (unless you've configured the VM for 3D graphics)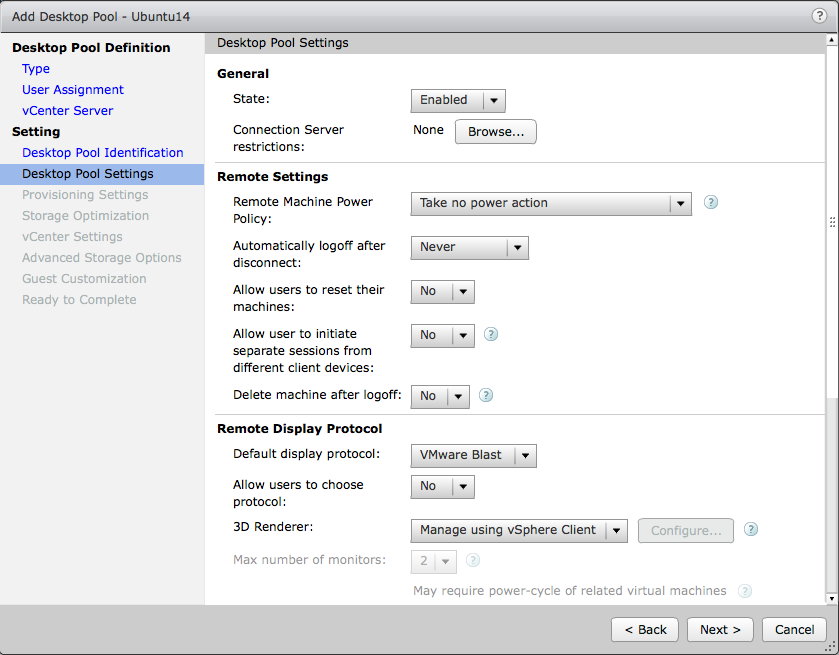
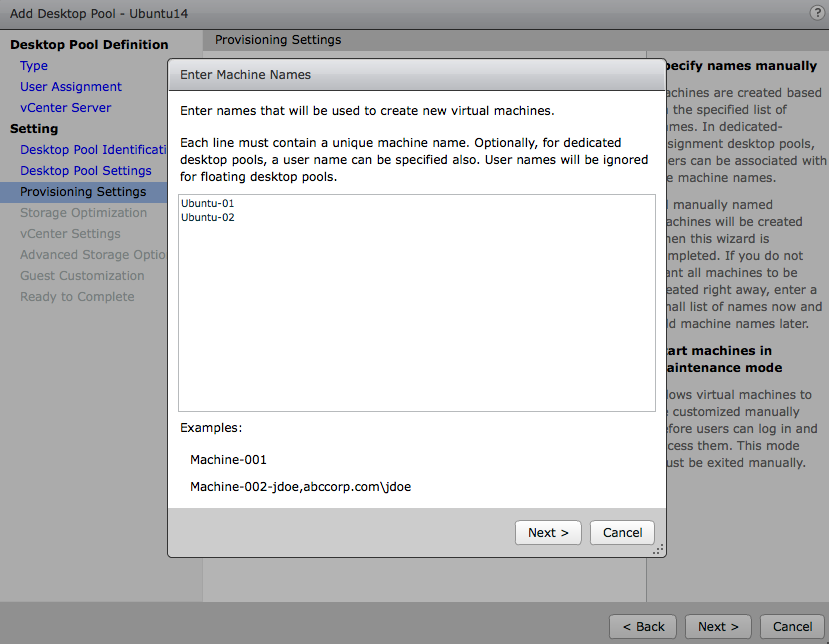
- For Provisioning Settings, specify the names manually
- Finish the rest of the prompts and review the Ready to Complete page. Check the box to Entitle Users after the wizard finishes, and click Finish
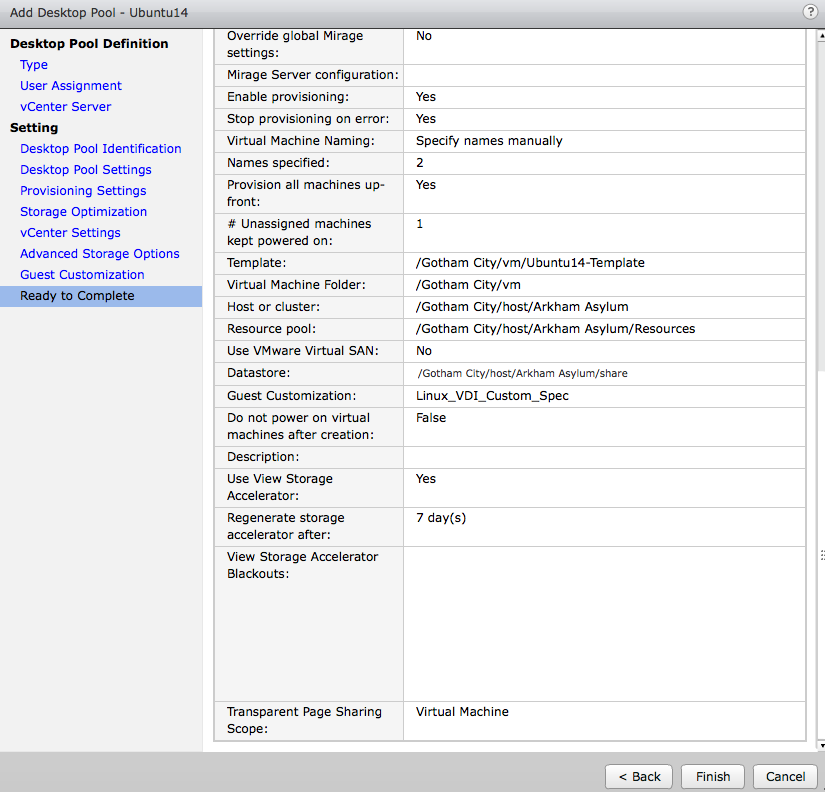
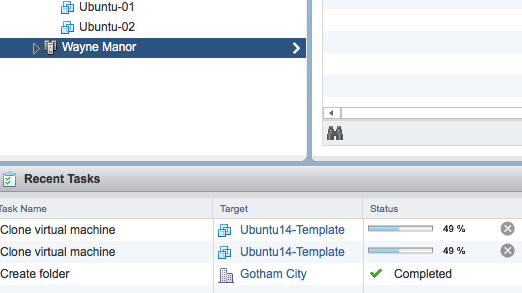
- At this point, you should see the VMs in vCenter and the cloning operation status. Horizon Administrator should also show the VMs as Provisioning
:: Verify all the things
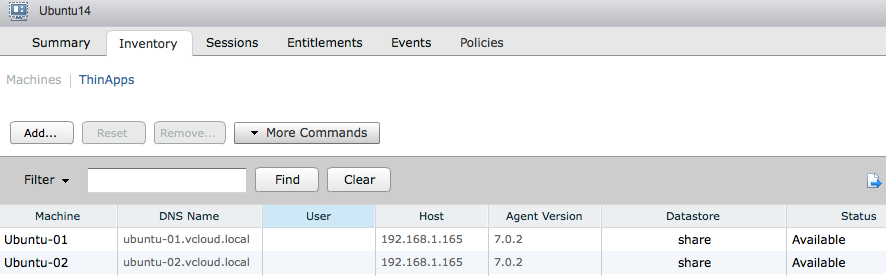
- We want to make sure our RunOneScript worked. Verify with your Active Directory that the desktops were properly joined to the Domain. You should also see the DNS Name being reported in Horizon Administrator and showing Available
- Launch the Horizon Client and verify you can load the desktop and that it reads the new DNS name
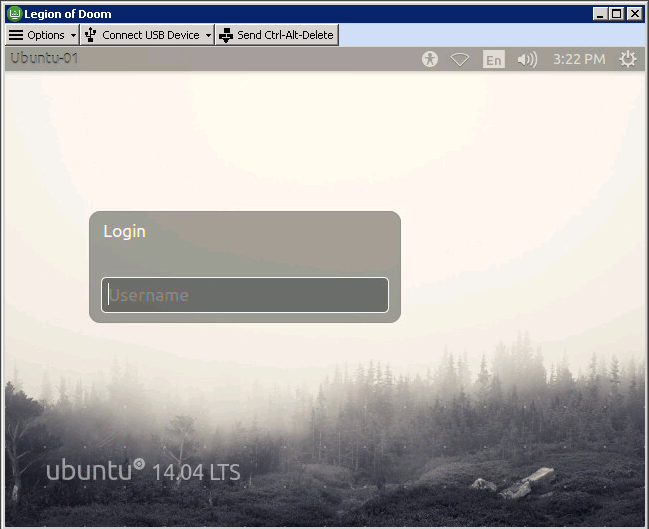
- If your login changes from earlier were done correctly, we should be able to login as one of our domain users (username@domain).
Thanks for reading!