
If you’ve found yourself building a modern application in SwiftUI, there’s a good chance you started building it as an iOS app, and eventually began tinkering with WidgetKit. As you progressed through your development, you realized that only a few tweaks were needed to make it a really good iPad app as well. Once you were satisfied with iOS and iPadOS you figured, “What the heck… let’s test this thing on Mac Catalyst!”
At this point, the Widget Target is included for all 3 platforms and likely works well. So why would you want to remove the widget from the Mac Catalyst app?
Recently I had a need to remove the widget capability of my Mac Catalyst app due to the submission being rejected by the Apple App Store Review team. The Catalyst, obviously being a port of the iPadOS version of the application, was rejected due to “insufficient features or functionality:”
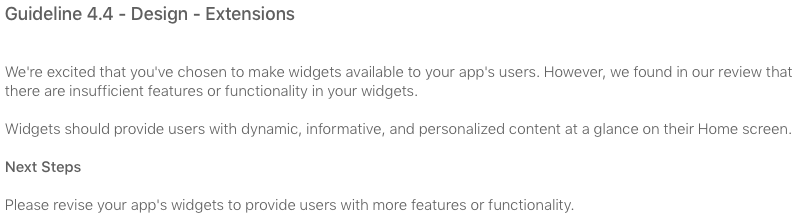
I was puzzled by this rejection, given the fact that the iOS/iPadOS equivalents of the application had been approved with the exact same widget. Multiple times over even. So why wouldn’t the widget be good enough for macOS? In my frustration, I swiftly submitted an appeal. After 30 hours I had calmed down… some. At that point I realized the widget capability likely wasn’t necessary for macOS, at least not with its current capability. So I decided to remove the widget target from the Catalyst app and will revisit it in a future update, hopefully with some added features and capability.
Removing the widget from Mac Catalyst
Since the Catalyst is essentially the same code as the iPadOS app, it might be slightly confusing on figuring out how to remove the widget piece without removing it from the iPad version. Or perhaps you just forgot where to make this config change. Luckily it’s fairly easy to do.
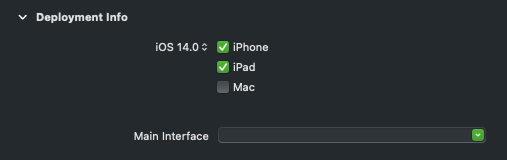
- In Xcode, navigate to the root of your application, select Targets, and select your Widget Extension
- Select the General tab
- Under Deployment Info UNcheck the box next to Mac
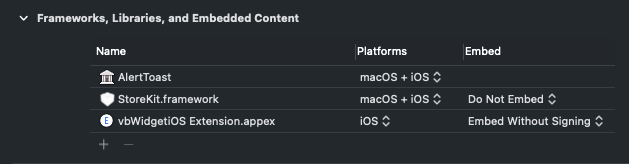
- Now under Targets on the left pane, click onto your primary App Target
- Scroll down to Frameworks, Libraries, and Embedded Content, find your Widget Extension, and change the Platform to iOS Only (NOTE: iOS here also refers to iPadOS)
Here’s how these should now look:
Be sure to run and test your app to ensure everything else still works as expected.
I hope you found this post helpful!